We've gotten most of the things we have moved into the house. There are a few more things to do, organize the closet space, put the little things away, etc. But for the most part I am extremely happy with the way things look now.
We had temps down into the twenties outside, but the temperatures have remained steady inside, not once has it been below 60. We have used the pot-bellied stove a couple of times to ward off the chill which brings the temps up to around 72, very comfortable living in my humble opinion.
Here are the pics I promised...
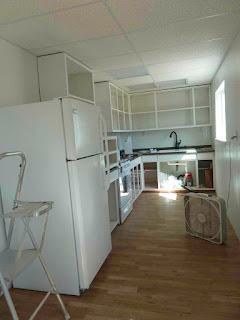
The kitchen is completely finished. And as I'd noted in an earlier pic of the kitchen, there isn't as much space as there looks to be while everything is empty. However, I do like that I don't have to cram everything into the cupboards, I can access the things I need regularly without have to pull out half a cabinet of stuff first.
View of the kitchen and dining area.
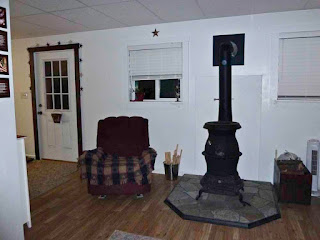
Our pot-bellied stove where the living room starts.
The window side of the living room.
Moving around to the back of the living room.
The back part of the living room, to the left of the image is the doorway which leads into the computer room, bedroom and bathroom.
This is the computer desk (before shot) that was custom built for me.
The after shot with all my geeky computer equipment in place. On the left is the lovely old bookcase I purchased from my friend Kathy West.
This is the bathroom, all finished.
The shower area, not much has changed from the earlier pictures I posted, other than some carpeting and the addition of a shelf to hold my towels.
This last one is of Tom putting in the pipe for the pot-bellied stove. We still have to add the siding to the outside front. But Tom has been busy doing odds and ends inside. Looking for studs for me so that I can hang my pictures, etc.
This is a journey into building an underground living space with shipping containers.
Sunday, November 20, 2011
Tuesday, October 25, 2011
The Livingroom is just about finished
We are almost there....woo hoo...Tom finished up putting down the floor in the livingroom. He's put the pot-bellied stove in place and there are just a few more things to do. The guys will be caulking the kitchen, putting the baseboards up in the livingroom and Ronnie will be building the computer desk (the guys came up with this wonderful idea when I was having problems finding desks I liked that would fit into the space we had for them) in the room next to the livingroom. We plan on being in the containers by the end of the week. I'm not saying I will have everything in there by the end of the week, I'm too old to be moving that fast, pardon my pun. But it will be livable. Our wiener dog has already moved in, check out the picture of the pot-bellied stove. You'll notice there is a sleeping bag/bed next to it. That belongs to Gator, our dashie, he moved in last week. I had a heck of a time getting him to come back up to the RV in the evenings, he evidently was quite comfortable in the containers.
When we first decided to build with shipping containers, our reasoning was two-fold, a inexpensive customized house and one that would be energy efficient. Which is why we've bermed the outside of the containers, Tom will continue to build up dirt on the outside of the containers. Tom strengthened the container wall which will carry the most load, the rear wall, by welding steel beams to the container. I'd looked around the Internet for guidance on building a home with containers, needless to say, there was not much in the way of actually building a shipping container home, as far as materials and how-tos go. This is when I decided to write this blog of our journey of creating a home out of a shipping container. As we've built our home, some of our original ideas for the place have changed. Some of this was due to need/wants and some due to the fact that we had to adjust our theories based on what was physically feasible to do with a shipping container. For instance, we did add an air conditioner, which we had not planned on doing until this summer, when temperatures here in eastern OK got up around 105 plus degrees. We were also going to put a breakfast bar into the kitchen beneath the window, but the space would not allow for it. Had we added a fourth container, we would have been able to have the bar. Tom had to talk me into 3 containers as it was, I didn't want to have to clean that big of a place, as I said in the beginning, I'm old and getting older. I wanted something manageable in my twilight years. We also originally had planned to have the roof covered with dirt, however, containers have their strength on the four corners, not all over, so this idea was scrapped and we put a regular tin roof on top, pitched so that the heavy snow and or ice wouldn't put extra weight on the container. All of that being said, I've decided to keep the blog going for a bit. I will keep you abreast how living in a tin can compares to what we thought it would be like living in a container. I will let you know over the coming year how stable the temperatures are within the place and if we run into any problems that need attention.
This is the before the floor went in shot. I was still staining a few things. I decided on a darker stain to break up all that white.
This is where the TV will be hanging. Below are two shelves to hold the cable box and whatever else I need for the TV.
In this shot the floor has been laid, ain't it purdy? And the door on the right leads to the computer area and bedroom.
You'll notice Gator's sleeping bag next to the stove. He will sleep in it no matter what the temperature. He has three different kinds of sleeping bags. This is because if I have to wash one or something happens to one, we won't have to listen to him whine and cry until he can get back into it.
Here is the other side of the livingroom. The stove just needs the pipe going out. One of the great things about this particular stove is that if the electricity goes out due to an ice storm or something, I can cook on it and keep warm all at the same time.
This is going to be the computer desk. I will be able to fit the desktop PC and the laptop on it. The men thought this up for me after I was measuring the area to see what kinds of desks would fit. I will eventually have a shelf above the desk for speakers and computer stuff.
P. S. If anyone out there is deciding they might like to do this also, don't hesitate to contact us and ask questions....I'm also thinking since he has so much experience now, I might hire out the hubby for a few extra $$....:)
When we first decided to build with shipping containers, our reasoning was two-fold, a inexpensive customized house and one that would be energy efficient. Which is why we've bermed the outside of the containers, Tom will continue to build up dirt on the outside of the containers. Tom strengthened the container wall which will carry the most load, the rear wall, by welding steel beams to the container. I'd looked around the Internet for guidance on building a home with containers, needless to say, there was not much in the way of actually building a shipping container home, as far as materials and how-tos go. This is when I decided to write this blog of our journey of creating a home out of a shipping container. As we've built our home, some of our original ideas for the place have changed. Some of this was due to need/wants and some due to the fact that we had to adjust our theories based on what was physically feasible to do with a shipping container. For instance, we did add an air conditioner, which we had not planned on doing until this summer, when temperatures here in eastern OK got up around 105 plus degrees. We were also going to put a breakfast bar into the kitchen beneath the window, but the space would not allow for it. Had we added a fourth container, we would have been able to have the bar. Tom had to talk me into 3 containers as it was, I didn't want to have to clean that big of a place, as I said in the beginning, I'm old and getting older. I wanted something manageable in my twilight years. We also originally had planned to have the roof covered with dirt, however, containers have their strength on the four corners, not all over, so this idea was scrapped and we put a regular tin roof on top, pitched so that the heavy snow and or ice wouldn't put extra weight on the container. All of that being said, I've decided to keep the blog going for a bit. I will keep you abreast how living in a tin can compares to what we thought it would be like living in a container. I will let you know over the coming year how stable the temperatures are within the place and if we run into any problems that need attention.
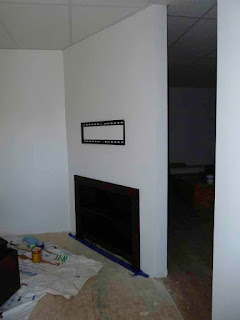
This is the before the floor went in shot. I was still staining a few things. I decided on a darker stain to break up all that white.
This is where the TV will be hanging. Below are two shelves to hold the cable box and whatever else I need for the TV.
In this shot the floor has been laid, ain't it purdy? And the door on the right leads to the computer area and bedroom.
You'll notice Gator's sleeping bag next to the stove. He will sleep in it no matter what the temperature. He has three different kinds of sleeping bags. This is because if I have to wash one or something happens to one, we won't have to listen to him whine and cry until he can get back into it.
Here is the other side of the livingroom. The stove just needs the pipe going out. One of the great things about this particular stove is that if the electricity goes out due to an ice storm or something, I can cook on it and keep warm all at the same time.
This is going to be the computer desk. I will be able to fit the desktop PC and the laptop on it. The men thought this up for me after I was measuring the area to see what kinds of desks would fit. I will eventually have a shelf above the desk for speakers and computer stuff.
P. S. If anyone out there is deciding they might like to do this also, don't hesitate to contact us and ask questions....I'm also thinking since he has so much experience now, I might hire out the hubby for a few extra $$....:)
Tuesday, October 18, 2011
The Bedroom and my new platform bed...
We have a sleep number bed, which by the way, I highly recommend. It doesn't require a foundation if you have a platform frame. I also wanted storage under the bed and not with drawers. So, I looked in the furniture stores and I looked online, I looked and looked but couldn't find anything that suited me. So, my very talented hubby built one to my specs...and here it is bare bones. Notice the floor is almost completely laid also. Just a few finishing touches on the bedroom and it too will be finished. That leaves the livingroom and the closets.
We still have some finish work to do on it, but basically, the bottom half, where the bed will rest, lifts up and I can store all kinds of stuff under there.
Woo Hoo....The Kitchen is finished!!!
The men went down today and finished up the little bits in the kitchen. They put the baseboard down, the spice cabinet in and the exhaust fan along with framing the window. I did some more painting on the rest of the baseboards and the window frames.
Sunday, October 16, 2011
More work on the Upper Cupboards
Almost finished with the kitchen. The upper cabinets are painted and most of them installed. The men built a spice cabinet for me which, when finished, will go above the exhaust fan/hood of the stove. Tom has put down the rest of the flooring (pics of that to follow in the next post).
The raw cabinets.
After I got them all painted.
Here is Tom checking to make sure everything is level and lined up properly.
Look at all that cabinet space! Woo Hoo, I said to myself, then I started thinking that by the time I get all my stuff into them, I will mostly likely be crying that I don't have enough room.
Here are the other pics, I promised of the kitchen.
Here you can see the flooring finished and the cabinet on the counter will go above the stove's exhaust fan. It's the spice cabinet I spoke about in the beginning of the post.
This is the almost finished product. We have the exhaust fan and spice cabinet to put up still. We will be painting the floor boards tomorrow and that will be it for the kitchen!
Monday, October 10, 2011
The Upper Cabinets and a surprise....
Ronnie has started the upper cabinets and appears to be almost finished, other than putting them onto the walls. Tom was doing a few odds and ends items around the containers and then decided to surprise me with putting together my hall tree that I wanted as you come into the house.
And my stove has been put into place.
Here is the Hall Tree, but I might have to paint it white too.
And my stove has been put into place.
Here is the Hall Tree, but I might have to paint it white too.
Saturday, October 8, 2011
Last of the Walls and the ceiling is finished
Tom finished putting up the last of the ceiling tile, while I got busy painting the last of the walls in the bedroom. And I painted the last lower counter/cupboard in the kitchen. Ronnie has already started the frames for the upper cupboards. You will notice there aren't any doors on these cabinets...that's not a design flaw. I decided to have open cabinets because after years of living in a truck, Tom and I can't remember to shut the darn things. So, rather than bang Tom's head (I'm too short to smack my head...haha), I decided to not put in doors on the cabinets. Hard to tell it's a shipping container, isn't it?
Tom putting up the ceiling tile.
The last wall, painted...woo hoo!
All the bottom cupboards finished.
Tom putting up the ceiling tile.
The last wall, painted...woo hoo!
All the bottom cupboards finished.
Thursday, October 6, 2011
More Updates...Kitchen and Ceiling
Well, both Tom and Ronnie have been hard at it. Tom trying to finish off the ceiling and Ronnie in the kitchen. With me painting whenever both are taking a day off. They've gotten the boards (beam look) up in the livingroom and going into the bedroom. I still have the bathroom door to finish, though I haven't decided for sure whether to stain or paint it white. I am planning on finishing the painting on the bottom cabinets in the kitchen this weekend, when Tom and Ronnie usually are not there. And there isn't any sawdust flying around to stick to the wet paint. Work ended early today, Tom and Ronnie had to go into Lowe's for supplies.
Tom hard at work on the ceiling in the bedroom
Tom in the computer room putting up ceiling tiles.
Ronnie did a great job on my kitchen so far, didn't he?
Tom hard at work on the ceiling in the bedroom
Tom in the computer room putting up ceiling tiles.
Ronnie did a great job on my kitchen so far, didn't he?
Wednesday, September 28, 2011
Starting the Kitchen
Tom finished up the ceiling and I have gotten the walls painted. So Ronnie has started putting in the cupboards, countertop and sink. Here's a look at the progress so far....
The walls going up in the kitchen with insulation.
The walls are all up and painted and the ceiling is going up.
The cupboards
Almost there!
Now it needs a coat of paint!
The walls going up in the kitchen with insulation.
The walls are all up and painted and the ceiling is going up.
The cupboards
Almost there!
Now it needs a coat of paint!
The Ceiling-updated
Here are a few more pics, the ceiling is almost finished in the livingroom. The kitchen is complete. We are heading for the home stretch!!!
Tom putting in the last kitchen light in the main cooking area.
The finished product.
Working on finishing up the living room.
Tom putting in the last kitchen light in the main cooking area.
The finished product.
Working on finishing up the living room.
Saturday, September 17, 2011
The Ceiling
Tom and Ronnie have gotten the walls up and I've painted them. White, because I want all the reflection I can get into the other rooms. Tom has started putting up the ceiling tile. We are getting there, finally! Seemed slow going there at times, but the weather has settled down a bit, it is reasonably cooler than the plus 100 degrees we were having, so things are getting down again.
Finishing up the Walls |
The rails for the ceiling tiles |
Ceiling tiles going up in the kitchen |
Tuesday, August 23, 2011
Finishing the Bathroom
We've finally managed to get the bathroom all painted and the sink, toilet and shower are in place. All that is left is a few finishing touches, like putting up the mirror and shower curtain.
Subscribe to:
Posts (Atom)